Thursday, August 29, 2013

Halloween Treat Bags

Are you in charge of helping out at your kids' Halloween party at school this October? Or perhaps you are throwing a party at your home, or want to get extra crafty and festive for the trick-or-treaters!  We love this idea found on the SRM Stickers Blog by Amy Crockett of the Scrapping Mommy.  It's an extra special Halloween treat bag and we'll show you how simple it is to make here! 


As More Than Paper is rolling out a crafter's corner this fall, we are adding new products each week.  This week we added these fantastic Kraft Bags by SRM.   Available in two different sizes (medium and large) and value priced, these make the perfect start to your decorated treat bags. 


Amy embossed her treat bags with a large spider web pattern.  Amy has a Cuddlebug so this was easy for her!  If you don't have a Cuddlebug, you can skip this step as the stickers, stamps and twine are enough to keep this bag super cute!  We also have a great selection of other bags, some of which are pre-embossed.  Check them out! 


Then she used a round tag and decorated it with SRM stickers.  Alternatively, you could use Halloween stamps or U.B.U. Haunted Shack by PSA Essentials to decorate the tag.   Stamp the character onto white paper, punch out and then adhere with craft glue or Zapdots to the kraft bag. 

PSA Essentials - Peel & Stick Packs (Happy Halloween)

Amy then added twine from The Twinery in Charcoal, now available at More Than Paper in our crafter's corner!  Add your "TRICK OR TREAT" sticker by SRM, available here at More Than Paper. 


Now you are ready to rock with these adorable treat bags for the classroom, at your home party or to pass out at Halloween. 

Be sure to visit Amy Crocket at The Scrapping Mommy and tell her how much you love her adorable project, you can see more about this project here too! 

Tuesday, August 20, 2013

Family Meal Traditions

It's a wonderful thing to have traditions that get passed on from generation to generation, especially food ones.  Learning how to make a dish from your grandmother, for example, will always be treasured in your heart.  Long after she has gone, you can honor her memory and relive time spent together just by making a dish. 

In many families, gefilte fish gets made and served on Passover, but we know of at least one family who has been serving it for Rosh Hashanah for generations.  Whether it is your tradition or you are looking to start a new one this holiday, check out this recipe we adapted from Food.com. 


Photo credit: Lisa Larvey via Chow

Ingredients:
6 lbs white fish (weight of the whole fish) 
6 lbs yellow pike (weight of the whole fish)
3.5 lbs carp (weight of the whole fish) 
2 large Spanish onions, peeled and sliced in wedges
1/4 cup salt (separated) 
1 cup of sugar (separated)
1 tablespoons matzo meal 
4 eggs, lightly beaten 
fresh ground white pepper or black pepper 

Directions:

1.  Ask your local fish store to remove all the skin and to fillet the fish, reserving the bones and heads for you. Also ask for an extra head (it will improve the broth). 

2.  Put the fish heads and bones into a large wide pot along with 1/8 cup salt, 1/2 cup sugar, and one onion (cut into wedges).  Cover with plenty of water and bring to a boil.  

3.  Meanwhile, finely grind the fish with one of the onions in a grinder (you can use the grinder attachment of a mix-master).


4.  Transfer the mixture to a bowl and add the remaining salt, sugar, matzo meal, eggs and pepper.  Mix well and let sit. 

5.  Prepare the fish balls.  Keeping your hands moist with cold water (we like to keep a bowl of water close by to dip the palms of your hands before getting the batter each time), form oval spheres to the size of very large eggs (they will expand slightly when cooked) and drop them carefully, one by one, into the pot with the fish bones.  The water should be kept at a slow simmer as you continue to add the fish balls. 


6.  After all the balls have been added, simmer for 1 hour and 45 minutes partially covered (we use tin foil to cover half of the pot).  Add additional water as necessary so that there is enough liquid to keep the balls afloat. 


7.  The key to good gefilte fish is to taste the broth at various intervals.  We recommend tasting at 45 minutes and then again 45 minutes later.  The broth should be tasty, not too salty and should be sweet.  Add salt and sugar as needed to the broth.  Keep adding and tasting until the broth tastes just right.

8.  Remove from heat and let the fish balls cool slightly in their liquid. 

9.  With a slotted spoon, remove the fish balls to a serving platter. 

10.  Strain the cooking liquid. Pour it over the fish and refrigerate until cold (overnight if possible - we prefer at least two nights prior to eating).  The liquid should gel a bit.

11.  Serve the fish cold with beet horseradish.  We love this recipe here.


Make the tradition even more personal with this personalized platter by Boatman Geller available at our store, More Than Paper. Find other things you'd like to have for entertaining this holiday season at More Than Paper including great hostess gifts, items for entertaining, and cards for the Jewish New Year (on sale now!) 


Boatman Geller - Personalized Melamine Platters (Suzani Gold) (23965)


What are your family traditions?  We'd love to hear about them in our comments.  And don't forget to share this recipe on Facebook or Pinterest with your friends! 

Thursday, August 15, 2013

5 things to do with Apples & Honey

In getting ready for the Jewish New Year coming up on September 4th, More Than Paper has collected 5 things to do with apples and honey so you’ll be sure to have a sweet new year.    Here are some ideas to do with your kids or on your own to honor traditions and make this year special!     

#1:  Make apple stamped artwork!  Slice an apple in half and let the natural inner pattern guide your kids in a painting experience.  Dip the apple in fall colors of deep red, orange, and yellow.  Stamp in patterns to make beautiful artwork.   When the artwork is dry, you can frame it, wrap it up and add an apple stamped tag like this one we found here.   Bring it over to dinner and give the artwork as a present to grandparents – a keepsake they’ll likely treasure no matter how it turns out!

Fun with apples for Rosh Hashanah!
Photo via Baby Center, image by Nicole Gerulat of A Little Sussy


#2:   Make your own Challah!  Have you ever tried making your own Challah?  We found a great apple Challah recipe with step by step directions (and photos!) from KingArthur Flour Blog.   Don’t forget your round pan here!  

Recipe photo
Image via King Arthur Flour Blog 

#3: While you are in a baking mode, try this honey tea cake.  You'll find the recipe and gorgeous food photography here on Tartine and Apron Strings blog (foodies: take note!) It makes a delicious dessert on Rosh Hashanah. 


Image via Tartine and Apron Strings blog

#4:   Can and label your own honey!   These make great decorations on the table or small hostess gifts.  Purchase honey in bulk at your local grocer and mason jars at Michael's or your local craft store.  Pour in honey and then add your own labels or sentiments using your personalized stamp.  Checkout these Rosh Hashanah printables that we found online, too that would be great on these honey jars. 

Image via Pinmarket

#5: Make crafty pom-pom apples as decorations!    You’ll need a red pom-pom, green felt cut into oval shapes for the leaves, and brown pipe cleaners.  Super glue or hot glue together in the shape of an apple and voila!  You have an adorable craft to do with older kids in the spirit of the New Year.  (These also make a cute gift for a teacher when going back to school!) 

Image via Pinmarket

While you are in the spirit, don't forget about sending cards for the holiday!  Our Jewish New Year cards are up to 20% off retail and many designers are offering free return address or address labels for additional savings! We have thousands of card design, including ones with apples and honey.  Shop all of them here


Have a sweet new year! 


Thursday, August 8, 2013

School Lunches


A new school year brings such promise, such excitement!  As a parent, going back to school means getting organized for the year ahead and gathering some ideas to make life easier during the school year.  This week we are tackling school lunches.  For a parent of a picky eater or someone who’s tired of throwing away a full lunch box at the end of the school day, we’ve got some ideas on how to make school lunches more fun. Our goal is a healthy lunch that actually gets eaten!

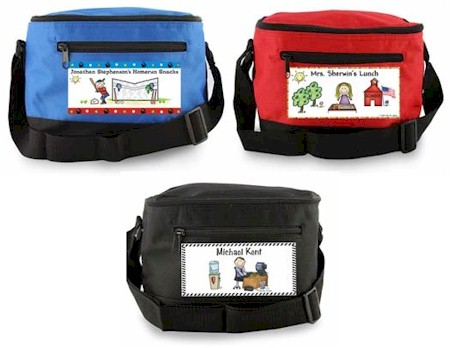
What’s that they say in marketing?  Packaging is everything!   So start with a really cool personalized lunch sack or lunch box.   We like these ones by Pen at Hand.  They are insulated and leak proof with a zipper closure and zippered front pocket and rear mesh pocket for storage.  They have a reinforced adjustable shoulder strap and are available in red, black or blue.  You choose your character and sketch that matches your child and their interest.  See them all here

Pen At Hand Stick Figures - 6-Pack Lunch Sacks (Schoolhouse-girl)

If you prefer old school style lunch boxes, More Than Paper has a bunch to choose from!   


Lunch Boxes

Inside the lunch box, get creative with the food.  See this via Pinterest, it's an adorable ham and cheese sandwich on white bread, just cut out the “face” of the lamb and add some pine nuts for eyes.  Cut the ham in long strips and assemble in curly cues and cut veggies in various shapes of hearts and flowers and you have an adorable “farm” for lunch. 

Lunch box ideas for kids
Image via Pinmarket

Try this adorable bear sandwich by Susan Yeun that sure to bring a smile to your son or daughter's face when they open up the lunch box.

Cute food for kids
Image by Susan Yeun

We also like this slightly less healthy option of mac and cheese and hotdogs.  Cut the hotdogs into little octopuses from Green Mommy Diapers.


Image via Green Mommy Diapers


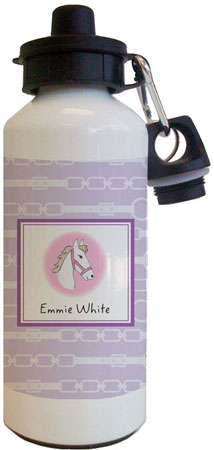
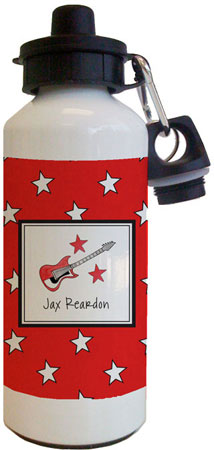
It’s also important to keep your little one hydrated so be sure to pack some water, which is much better than a juice box (says your child’s dentist!)  A personalized water bottle may encourage water drinking so here are some to try.  Little girls who love horses will adore this stainless steel lined water bottle that holds 20 ounces of a cold beverage.   It also has a sports lid and screw-off top! 

Kelly Hughes Designs - Water Bottles (Saddle Up) (wb378)


Kelly Hughes Designs - Water Bottles (Rock Star) (wb379)

We just love the idea of writing notes to your child in their lunch box to let them know you are thinking of them.  Even if your son or daughter can’t read, you can still add a note! Draw an eye, a heart, and the letter “u” for “I love you!”  We love this imprintable letterhead stationery, perfect for school!  

Masterpiece Studios Imprintable Blank Stock - School Stuff Letterhead (901913)

We also found these awesome free lunch box printables on Skip to My Lou.  Just download, print and add into your child’s lunch box. 


Free printables available on Skip to My Lou 


We hope you have some ideas on how to make school lunches more fun this year!  If we have missed any good ones, be sure to leave us a comment and let us know your ideas!  And don’t forget to share this with your friends on Facebook!  

Thursday, August 1, 2013

Stress Saving Hostess Tips

It is likely that you have hosted a dinner party at your home once and been completely overwhelmed.  Running around before guests arrive, constantly filling drinks and passing hors d’oeuvres, getting dinner on the table and then cleaning up – it’s all exhausting.   Sometimes for the host, hostessing isn’t all that much fun.  At More Than Paper, we have some tips for entertaining to make it less stressful and more fun.   So next time you can actually enjoy the company of your guests!   Here are five ways to make hosting easier. 


1. Plan a menu that’s easy to serve.   This is not the time for risotto.  Choose a main dish recipe that you can put in the oven just as guests are arriving like stuffed shells. You’ll want to plan a cohesive menu that makes sense throughout each course.   So if you are serving an Italian dish like stuffed shells, choose an appetizer like an antipasto platter or caprese salad.

Photo credits: Food.com, Food Network.com 

2.  Set up a bar!  Have a pre-mixed cocktail like this easy red sangria recipe we found.  Have beer and wine available in a bucket for guests to help themselves and this will eliminate your constant question: “Can I get you another drink?”  We love our personalized ice buckets at More Than Paper and think they’re a great touch to any drink table.  Don’t forget to include non-alcoholic beverages and something for kids if they’re invited.  

Photo credits: Food Network.com 

3.  Set the table the day before along with your flowers or centerpiece.  This is one detail you don’t want to have to be doing while guests are at your home and can do in advance to save stress the day of the party.  For an Italian style dinner party, try using fresh herbs like basil and rosemary in small planters in lieu of flowers.  We love this Italian styled dinner party décor we found on The Pretty Blog. 


4.  Have serving accessories to help.   A good quality serving tray will help you carry things from the kitchen to the table and you’ll look cute while doing it!  More Than Paper has dozens of bamboo and Lucite serving trays to try.   See them all here.


5.  Assign one guest the responsibility of dessert.   Serving a three course meal to a group of people can be daunting, so when a guest asks if they can bring something you should take them up on their offer.  Suggest that they bring something easy for a dessert; like store bought biscotti or tiramisu from the grocery bakery!

Key Lime Biscotti with Key Lime Glaze 3
Photo Credit
Hosting friends doesn’t have to be a chore.  There’s no reason to stress out over recipes, menus, details, and drinks.  With some advanced planning and these few tips, you should be able to host a dinner party that doesn’t overwhelm you.  Hopefully it’s one you’ll actually enjoy!